
DAY-28. JDBC 이클립스 연동, 데이터 조작
🔐 2022-04-11
데이터베이스 - JDBC
❗ 수업을 듣고, 개인이 공부한 내용을 적은 것 이기에 오류가 많을 수도 있음
1️⃣ 데이터베이스와 이클립스의 활용
데이터베이스와 이클립스 연동
public class Test {
	public static void main(String[] args) {

		try(Connection con = DriverManager.getConnection("jdbc:oracle:thin:@localhost:1521:xe","kh","kh"))	{
			System.out.println("DB 접속 성공!");
		}catch(Exception e) {
			e.printStackTrace();
		}
	}
}
- “jdbc:oracle:thin:@localhost:1521:xe”,”kh”,”kh” -> @localhost:1521:xe”,”계정아이디”,”계정비번”
- Connection 객체 생성 -> getConnection(url,username,userpw)
이클립스를 통해 데이터베이스의 데이터 추가
public class Insert {
	public static void main(String[] args) {

		String url = "jdbc:oracle:thin:@localhost:1521:xe";
		String username = "kh";
		String password = "kh";

		// Connection 객체 생성 -> url, username, password -> oracle과 연동시 필요
		try(Connection con = DriverManager.getConnection(url,username,password);
			Statement stmt = con.createStatement();){

			System.out.println("DB접속 성공");
			String sql = "insert into cafe values(seq_cafe.nextval, '아이스아메리카노', 3000, sysdate)";

			// executeUpdate() 메서드의 반환값(정수)
			int rs = stmt.executeUpdate(sql);

			if(rs > 0) { // 0보다 크다는건 insert update delete 중 작업이 실행이 됬다는것
				System.out.println("데이터 추가 성공");
			}
			else {
				System.out.println("데이터 추가 실패");
			}

		}catch(Exception e) {
			e.printStackTrace();
		}
	}
}
- Statement 객체를 활용한다 → 이때 Connection 연결이 확인된 후 생성
- Statement stmt = con.createStatement(); → 데이터베이스를 조작할 수 있게 연결
executeUpdate()
- stmt.executeUpdate(sql);를 통해 데이터베이스를 수정
- Statement 객체 생성 -> 오라클에서 sql 문을 전송해 쿼리의 결과를 요청할 수 있게 해주는 객체, 접속이 된후 생성
- 행의 데이터에 영향을 줄 경우(insert,update,delete) -> 행에 변화가 생김. -> executeUpdate() 메서드 사용
- executeUpdate 객체는 인자값으로 넘겨준 쿼리문을 통해서 영향을 받은 행의 개수를 반환한다 → 정수(int)로 받는다
❗ 주의
- Connection 사용시 반드시 가장 먼저 프로젝트에 JDBC연동 할 수있는 라이브러리 추가
- sqldeveloper에서 데이터 조작시 commit 반드시 해야한다.
이클립스를 통해 데이터베이스의 데이터 삭제
public class Delete {
	public static void main(String[] args) {

		String url = "jdbc:oracle:thin:@localhost:1521:xe";
		String username = "kh";
		String password = "kh";

		try(Connection con = DriverManager.getConnection(url,username,password);
			Statement stmt = con.createStatement();){

			// product_id 가 3인 데이터를 삭제
			String sql = "delete from cafe where product_id = 3";

			int rs = stmt.executeUpdate(sql);

			if(rs > 0) {
				System.out.println("데이터 삭제 성공");
			}
			else {
				System.out.println("데이터 삭제 실패");
			}

		}catch(Exception e) {
			e.printStackTrace();
		}
	}
}
이클립스를 통해 데이터베이스의 데이터 수정
public class Update {

	public static void main(String[] args) {
		String url = "jdbc:oracle:thin:@localhost:1521:xe";
		String username = "kh";
		String password = "kh";

		try(Connection con = DriverManager.getConnection(url,username,password);
			Statement stmt = con.createStatement()){

			String sql ="update tbl_student set name ='김영수', phone = '010-1234-1234', birth_date = '1985/12/20' where no = 1";
			int rs = stmt.executeUpdate(sql);

			if(rs > 0) {
				System.out.println("데이터 수정 성공");
			}
			else {
				System.out.println("데이터 수정 실패");
			}

		}catch(Exception e) {
			e.printStackTrace();
		}
	}
}
이클립스를 통해 데이터베이스의 데이터 조회
- 추가,삭제,조회는executeUpdate이지만 조회는 executeQuery을 사용한다
- ResultSet으로 값을 받는다
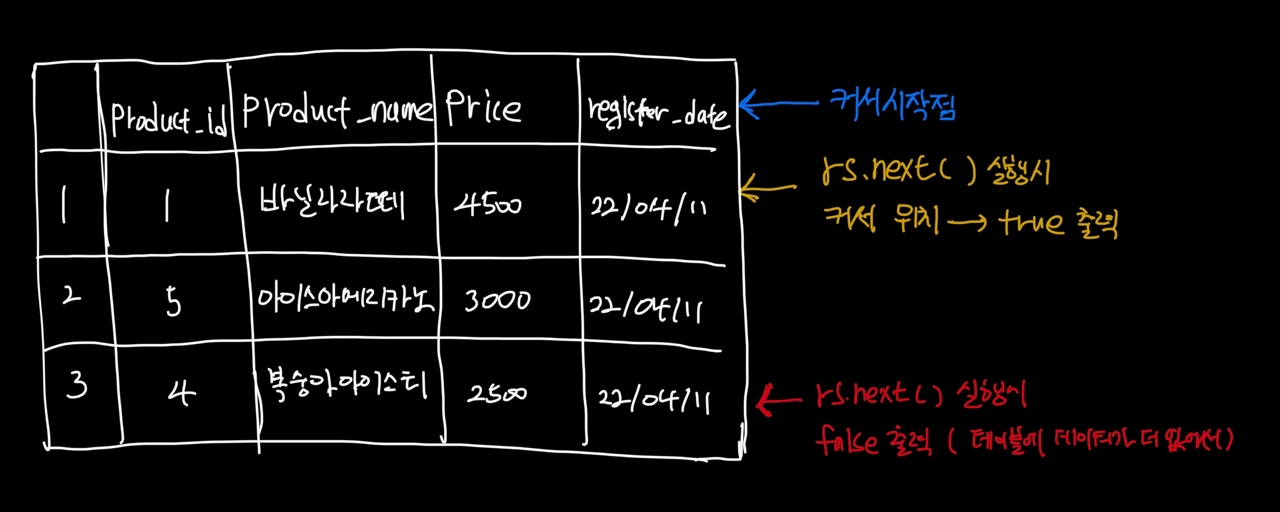
💡 ResultSet의 커서 개념
System.out.println("rs.next : " + rs.next()); // true출력
System.out.println("rs.next : " + rs.next()); // false 현재 product_id가 1인 데이터 밖에없다

// 커서가 데이터를 가리키고 있는 상태에서 값을 얻어내는 방법
/* product_id(1) -> number -> getInt,
 * product_name(2) -> varchar2
 * price(3) -> number -> getInt
 * register_date(4)) -> date
*/
- ResultSet을 이용하면 테이블의 가장 위쪽에 커서가 존재한다 따라서 첫번째 행을 가르키고 싶다면 rs.next()를 사용해야 한다
- rs.next() 실행 시 아래행에 데이터가 존재하면 true를 데이터가 없으면 false를 반환
- 오라클의 인덱스를 사용하는 방법(컬럼 인덱스를 활용)
public class Select {

	public static void main(String[] args) {
		String url = "jdbc:oracle:thin:@localhost:1521:xe";
		String username ="kh";
		String password ="kh";

		try(Connection con = DriverManager.getConnection(url,username,password);
			Statement stmt = con.createStatement()){

			// Product_id 가 1번인 메뉴 정보만 가져오기
			String sql = "select * from cafe where product_id = 1";
			ResultSet rs = stmt.executeQuery(sql);

			**// 1. 오라클의 인덱스를 사용하는 방법(컬럼 인덱스를 활용)**
			// 만약 커서를 내렸을때 행이 존재한다면 값을 출력하겠다 -> rs.next()가 true가 도출한다면
			if(rs.next()) {
				System.out.println(rs.getInt(1));  // 1번 컬럼
				System.out.println(rs.getString(2)); // 2번 컬럼
				System.out.println(rs.getInt(3)); // 3번 컬럼
				System.out.println(rs.getDate(4)); // 4번 컬럼
			}

		}catch(Exception e) {
			e.printStackTrace();
		}
	}
}
if(rs.next()) {
		System.out.println(rs.getInt(1));  // 1번 컬럼
		System.out.println(rs.getString(2)); // 2번 컬럼
		System.out.println(rs.getInt(3)); // 3번 컬럼
		System.out.println(rs.getDate(4)); // 4번 컬럼
}
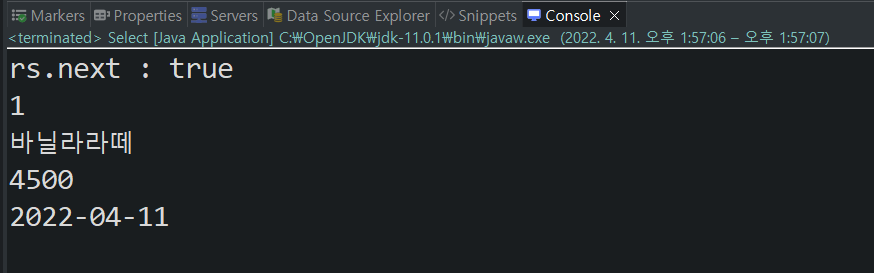
출력문)
- 컬럼명을 사용하는 방법
public class Select {

	public static void main(String[] args) {
		String url = "jdbc:oracle:thin:@localhost:1521:xe";
		String username ="kh";
		String password ="kh";

		try(Connection con = DriverManager.getConnection(url,username,password);
			Statement stmt = con.createStatement()){

			// Product_id 가 1번인 메뉴 정보만 가져오기
			String sql = "select * from cafe where product_id = 1";

			// 만약 커서를 내렸을때 행이 존재한다면 값을 출력하겠다 -> rs.next()가 true가 도출한다면
			// 2. 컬럼명을 사용하는 방법
			if(rs.next()) {
				System.out.println(rs.getInt("product_id"));
				System.out.println(rs.getString("product_name"));
				System.out.println(rs.getInt("price"));
				System.out.println(rs.getDate("register_date"));
			}

		}catch(Exception e) {
			e.printStackTrace();
		}
	}
}
- 테이블의 모든 데이터 출력
public class Select {

	public static void main(String[] args) {
		String url = "jdbc:oracle:thin:@localhost:1521:xe";
		String username ="kh";
		String password ="kh";

		try(Connection con = DriverManager.getConnection(url,username,password);
			Statement stmt = con.createStatement()){

		String sql = "select * from cafe";
		ResultSet rs = stmt.executeQuery(sql);

		// 데이터가 없을 때 까지 출력 하는법
		// while문을 돌려 rs.next()가 false가 나올 때 까지 -> 데이터가 없을 때
		while(rs.next()) {
			System.out.println(rs.getInt(1));
			System.out.println(rs.getString(2));
			System.out.println(rs.getInt(3));
			System.out.println(rs.getDate(4));
		}

		}catch(Exception e) {
			e.printStackTrace();
		}
	}
}
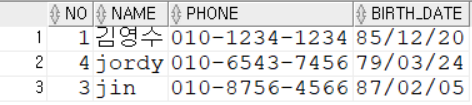
- 연습
데이터베이스
자바 코드
package com.kh.student;

import java.sql.Connection;
import java.sql.DriverManager;
import java.sql.ResultSet;
import java.sql.Statement;

public class Select {

	public static void main(String[] args) {

		String url = "jdbc:oracle:thin:@localhost:1521:xe";
		String username = "kh";
		String password = "kh";

		try(Connection con = DriverManager.getConnection(url,username,password);
			Statement stmt = con.createStatement()){

			/*
			// jordy 만 뽑아오기
			String sql = "select * from tbl_student where no = 4";
			ResultSet rs = stmt.executeQuery(sql);

			if(rs.next()) {
				System.out.println(rs.getInt(1));
				System.out.println(rs.getString(2));
				System.out.println(rs.getString(3));
				System.out.println(rs.getDate(4));
			}
			*/

			// 모두 뽑아보기
			String sql = "select * from tbl_student";
			ResultSet rs = stmt.executeQuery(sql);

			while(rs.next()) {
				System.out.println(rs.getInt(1));
				System.out.println(rs.getString(2));
				System.out.println(rs.getString(3));
				System.out.println(rs.getDate(4));
				System.out.println("");
			}

		}
		catch(Exception e) {
			e.printStackTrace();
		}
	}
}
Leave a comment