
자바스크립트 기초(모르는 것) 4편
🚀 자바 스크립트 기초(모르는 것) 4편
본 내용은 유튜브 “코딩앙마” 강의를 바탕으로 작성
❗ 개인이 공부한 내용을 적은 것 이기에 오류가 많을 수도 있음
2022-02-17
상속 / Prototype
const car = {
    wheels : 4,
    drive() {
        console.log('Drive!!');
    }
}

const bmw = {
    color : "red",
    navigation : 1,
}

const benz = {
    color : "black",
}

const audi = {
    color : "blue",
}
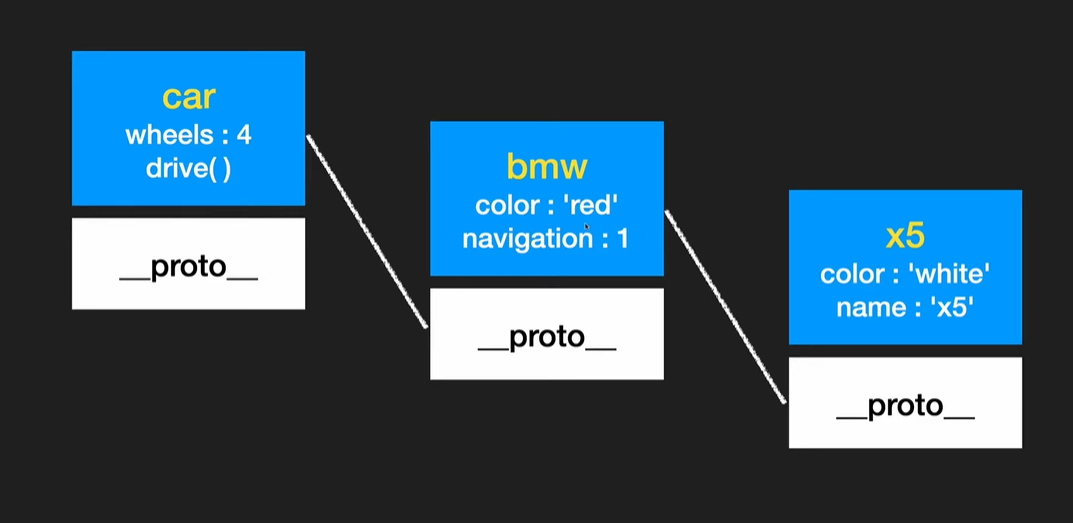
상속
// bmw, benz, audi는 car를 상속
bmw.__proto__ = car;
benz.__proto__ = car;
audi.__proto__ = car;

console.log(bmw.color); // red 출력
console.log(bmw.wheels); // 4출력 bmw객체에 wheels가 없다면 bmw객체의 proto인 car의 Prototype에서 찾는다
console.log(bmw);

Prototpye chain
// Prototype Chain 상속은 계속 이어짐
const x5 = {
    color : "white",
    name : "x5",
};

x5.__proto__ = bmw;
console.log(x5.color); // white
console.log(x5.name); // x5
console.log(x5.navigation); // 1
console.log(x5.wheels); // 4
- x5에 navigation이 없다면 bmw에서 찾기
- x5에 wheels가 없다면 bmw에서 찾기 또 없다면 car에서 찾기
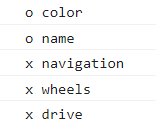
hasOwnProperty 이용
for (p in x5) {
    if(x5.hasOwnProperty(p)){
        console.log('o', p);
    }else {
        console.log('x', p);
    }
}
- 객체가 직접 가지고 있는 것만 true를 반환
Property
const Bmw = function(color) {
    this.color = color;
}

Bmw.prototype.wheels = 4;
Bmw.prototype.drive = function() {
    console.log('DRIVE!!')
}

// Bmw에 프로퍼티 추가
Bmw.prototype.navigation = 1;
Bmw.prototype.stop = function() {
    console.log('STOP!!')
}

// 생성자 생성
const x5 = new Bmw('red');
const x4 = new Bmw('blue');

console.log(x5.color); // red
console.log(x5.wheels); // 4
console.log(x5.navigation); // 1
class
// 일반
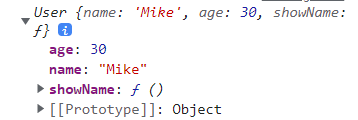
const User = function(name, age) {
this.name =name;
this.age = age;
this.showName = function() {
console.log(this.name);
}
}
const mike = new User('Mike', 30);
console.log(mike); // mike는 객체 내부에 showName이 있다
mike.showName(); // Mike
class 사용
// class와 constructor 사용
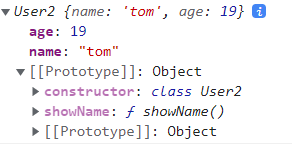
class User2 {
constructor(name,age) { // 객체 초기화
this.name = name;
this.age = age;
}
showName() {
console.log(this.name);
}
}
// class는 new가 반드시 필요하다
const tom = new User2('tom', 19);
console.log(tom); //tom에서 showName은 prototype안에 들어있다
tom.showName(); // tom
class 상속
class Car {
constructor(color) {
this.color = color;
this.wheels = 4;
}
drive() {
console.log('DRIVE!!');
}
stop() {
console.log('STOP!!!');
}
}
class Bmw extends Car{
park() {
console.log('PARK!!');
}
}
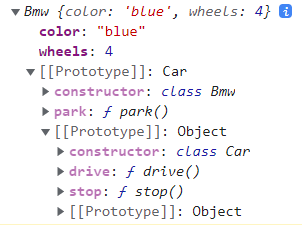
const z4 = new Bmw('blue');
console.log(z4);
z4.drive(); // DRIVE!! 출력
// z4에서 drive를 찾고 없으면 Prototype으로 또 없으면 Prototype에서 찾는다
-
class에서 상속은 extends 사용
class 오버라이딩
class Car {
    constructor(color) {
        this.color = color;
        this.wheels = 4;
    }

    drive() {
        console.log('DRIVE!!');
    }

    stop() {
        console.log('STOP!!!');
    }
}

class Bmw extends Car{
    park() {
        console.log('PARK!!');
    }

		// 메서드 오버라이딩
    stop() {
		// 만약 부모의 stop도 사용하고 싶다면?
		//  super.stop(); 사용
        console.log('OFF');
    }
}
z4.stop(); // STOP!!!이 아닌 OFF가 출력 (오버라이딩)

// super.stop() 사용시
z4.stop(); // STOP!! OFF 출력
생성자 오버라이딩
class Car {
    constructor(color) {
        this.color = color;
        this.wheels = 4;
    }

    drive() {
        console.log('DRIVE!!');
    }

    stop() {
        console.log('STOP!!!');
    }
}

class Bmw extends Car{
    constructor(color) {  // constructor안에 color를 넣어줘야 한다 안해주면 객체에 포함x
        super(color);
        this.navigation = 1; // Bmw만 가지고 있는것
    }

		park() {
        console.log('PARK!!');
    }
}

const z4 = new Bmw('blue');
console.log(z4);
z4.stop(); // STOP!!!이 아닌 OFF가 출력 (오버라이딩)

// super.stop() 사용시
z4.stop(); // STOP!! OFF 출력
Leave a comment